Supported Devices
Banana Pi
Alan Beadle
Introduction
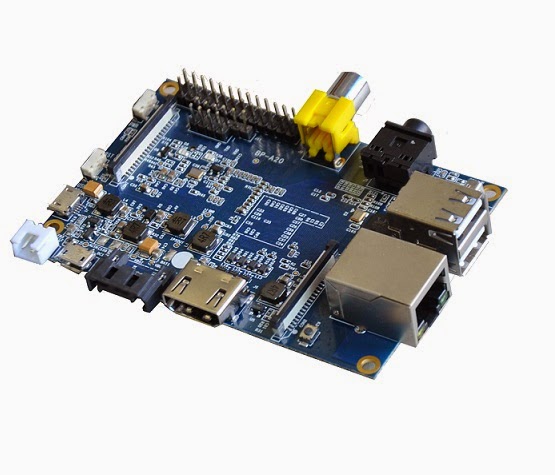
Banana Pi is a single-board computer, targets to be a cheap, small and flexible enough computer for daily life. Built with ARM Cortex-A7 Dual-core CPU and Mali400MP2 GPU Device introduction and/or SOC specifications
 | CPU Information Processor : ARMv7 Processor rev 4 (v7l) processor : 0 BogoMIPS : 1819.52 processor : 1 BogoMIPS : 1819.52 Features : swp half thumb fastmult vfp edsp neon vfpv3 tls vfpv4 idiva idivt CPU implementer : 0x41 CPU architecture: 7 CPU variant : 0x0 CPU part : 0xc07 CPU revision : 4 Hardware : sun7i Revision : 0000 Serial : 07026605535748488048566616516656 boot.log |
Installation
0) Download the banana pi hardware pack prebuilt from: http://clarkson.edu/~beadleha/crux/arm/bananapi/BananaPi_hwpack.tar.xz Or build it yourself with the instructions here: http://wiki.lemaker.org/BananaPro/Pi:Building_u-boot,_script.bin_and_linux-kernel
Note: This entire process should also work with the Banana Pro in theory, but you will need to build the hardware pack yourself according to the instructions linked above.
1) Set up the SD card according to http://wiki.lemaker.org/BananaPro/Pi:Setting_up_the_bootable_SD_card
That is, use fdisk to make 2 primary partitions, one at the beginning of the card of size 20M, and another that uses all remaining space.
2) Format the first (smaller) partition to vfat and the larger partition to ext4 using mkfs.
example:
mkfs.vfat /dev/mmcblk0p1
mkfs.ext4 /dev/mmcblk0p2
3) Erase the first part of the SD card to be safe:
example:
dd if=/dev/zero of=/dev/mmcblk0 bs=1k count=1023 seek=1
4) Write the bootloader to the SD card
example:
dd if=bootloader/u-boot-sunxi-with-spl.bin of=/dev/mmcblk0 bs=1024 seek=8
5) Mount the first partition.
example:
mount /dev/mmcblk0p1 /mnt/
6) Create a file called boot.cmd in that partition with the following contents:
setenv bootargs console=ttyS0,115200 noinitrd
disp.screen0_output_mode=EDID:1280x720p50 init=/init
root=/dev/mmcblk0p2 rootwait panic=10 ${extra}
fatload mmc 0 0x43000000 script.bin
fatload mmc 0 0x48000000 uImage
bootm 0x48000000
7) Generate boot.scr:
mkimage -C none -A arm -T script -d /mnt/boot.cmd /mnt/boot.scr
8) Create a file called uEnv.txt with the following contents:
bootargs=console=ttyS0,115200 disp.screen0_output_mode=EDID:1024x768p50 hdmi.audio=EDID:0 root=/dev/mmcblk0p2 rootfstype=ext4 elevator=deadline rootwait
aload_script=fatload mmc 0 0x43000000 script.bin;
aload_kernel=fatload mmc 0 0x48000000 uImage;bootm 0x48000000;
uenvcmd=run aload_script aload_kernel
9) Copy uImage and script.bin from the hardware pack into the first partition.
example:
cp kernel/uImage /mnt/
cp kernel/script.bin /mnt/
10) Now the kernel is ready to boot, and you just need to add a CRUX rootfs to the second partition.
umount /dev/mmcblk0p1
mount /dev/mmcblk0p2 /mnt/
Since the Cubieboard2 has the same CPU, we can use the optimized rootfs for that, or the generic one will work also.
wget http://resources.crux-arm.nu/releases/3.1/crux-arm-rootfs-3.1-cubieboard2.tar.xz
tar -C /mnt/ -xf ./crux-arm-rootfs-3.1-cubieboard2.tar.xz
11) Install kernel modules from the hardware pack:
mkdir -p /mnt/lib/modules
rm -rf /mnt/lib/modules/
cp -r rootfs/lib/ /mnt/
12) Unmount, cross your fingers, and boot!
umount /dev/mmcblk0p2
!!!! Booting CRUX-ARM from uSD (Prepare media install)
Booting CRUX-ARM from nand (Boot from media install)
Booting CRUX-ARM from other ways (not needed with media install)
Configuration
We should setup all the important files: pkgmk.conf, prt-get.conf, inittab, fstab, rc.conf, net ...